How to read one non-blocking key press in Ruby

During the development of a simple command line game in Ruby, I wanted to check if the player has pressed a given key in a non-blocking and buffered way. That is:

  • If no key was pressed, don’t wait for one to be pressed before continuing the program execution.
  • If the user has pressed and released a key before getting it, the method has to still get it.
  • The buffer should not wait for a \n character to be input before giving previous characters.
  • I want the ASCII code of the key for non printable characters such as ESC.

As usual, I hate it when my Ruby programs are not cross-platforms, so I wanted a working solution for both Unix and Windows.
… aaand it was more complicated than I thought.

First, there are no Ruby cross-platform way to do it. There are 2 Unix ways and 2 Windows ways.
I then wrote a module using those ways to get a cross-platform solution. See at the end!

Unix

The first Unix way I found calls the stty Unix command:

system('stty raw -echo') # => Raw mode, no echo
char = (STDIN.read_nonblock(1).ord rescue nil)
system('stty -raw echo') # => Reset terminal mode

The second Unix way I found uses the curses library:

require 'curses'
Curses.timeout = 0
char = Curses.getch
char = char.ord if char

Windows

The first Windows way calls the Win32 API:

require 'Win32API'
char = (Win32API.new('crtdll', '_kbhit', [ ], 'I').Call.zero? ? nil : Win32API.new('crtdll', '_getch', [ ], 'L').Call)

The second Windows way also uses the curses library, but with an ugly tweak on the LINES environment variable:

require 'curses'
ENV['LINES'] = '40' # Needed for curses to work in a Windows command line
Curses.timeout = 0
char = Curses.getch
char = char.ord if char

This solution wreaks havoc a bit in the command line display, but still works given my requirements.

Cross-platform solution

Based on this code, I wrote the following module to get a cross-platform solution, without using curses:

module GetKey

# Check if Win32API is accessible or not
USE_STTY = begin
require 'Win32API'
KBHIT = Win32API.new('crtdll', '_kbhit', [ ], 'I')
GETCH = Win32API.new('crtdll', '_getch', [ ], 'L')
false
rescue LoadError
# Use Unix way
true
end

# Return the ASCII code last key pressed, or nil if none
#
# Return::
# * _Integer_: ASCII code of the last key pressed, or nil if none
def self.getkey
if USE_STTY
char = nil
begin
system('stty raw -echo') # => Raw mode, no echo
char = (STDIN.read_nonblock(1).ord rescue nil)
ensure
system('stty -raw echo') # => Reset terminal mode
end
return char
else
return KBHIT.Call.zero? ? nil : GETCH.Call
end
end

end

[Edit]: Improved thanks to Vlad’s suggestion!

The following program can easily test this new module:

loop do
k = GetKey.getkey
puts "Key pressed: #{k.inspect}"
sleep 1
end

And here is the output while typing “Hello!”:

Key pressed: nil
Key pressed: nil
Key pressed: nil
Key pressed: nil
Key pressed: 72
Key pressed: nil
Key pressed: 101
Key pressed: nil
Key pressed: 108
Key pressed: 108
Key pressed: 111
Key pressed: 33
Key pressed: nil
Key pressed: nil
Key pressed: nil
Key pressed: nil

It works both on Unix and Windows 😀 Woot!

Hope it will help.

Howto, Ruby , , , , , , , , , , , , , , , , , , , , ,

I ventured in Tamriel with The Elder Scrolls Online

I just got the chance to participate to last week-end Elder Scrolls Online Beta session. Woot!
That was awesome to get back to Tamriel, and I enjoyed it both as a gamer and a developer/tester 😉

I won’t go into the gameplay, strategic decisions and comparisons with other Elder Scrolls games in this post. You can find all this info reading reviews everywhere, with a much better writing than I could do. Moreover I would be totally biased as I am completely addict to this series.

Zenimax devs: you’ll find my bug report below the screenshots section.

Screenshots

Here are some screenshots that show how beautiful Tamriel is – sorry for the HUD, but I didn’t know how to remove it.

Molag Bal statue in Coldharbour
Screenshot_20140228_212311

Weather is awesome!
Screenshot_20140301_201837

Night ambiance
Screenshot_20140228_194113

Foggy forest
Screenshot_20140302_132522

An Ayleid ruin
Screenshot_20140302_192216

Daggerfall’s mages guild and castle behind
Screenshot_20140302_201340

A portal just appeared far away. Really impressive in game!
Screenshot_20140302_205020

Dawn’s beauty
Screenshot_20140303_010509

ok, we are on the Internet, so… cats!
Screenshot_20140228_193917

Bug report

As Bethesda and Zenimax invited me to play this great game, I wanted to show my gratitude by reporting all the bugs I found while playing.
I couldn’t find a report forum or ticket tracker, so I am posting these right here.

Hey Zenimax devs! Thanks a lot for your great efforts in developing such a huge game with so many technical constraints and demands. You’ve made a wonderful job.
Here are the bugs I stumbled upon (from the most annoying ones to me). Hope this will help you put final corrections before launch!

  • Very often when arriving in a new zone (entering a building, running in the wilderness), objects, NPC and monuments take a long time to appear (around 30 secs – depends on lag apparently). This leads to many glitches: you discover empty zones, you miss easily quest targets you are supposed to encounter, you are being attacked by invisible enemies, you pass through walls and buildings, you get into zones you aren’t supposed to be. The only workaround is to wait for the world to appear.
    Some screenshots of the problem:

Missing scenery from Bethnik island:
Screenshot_20140302_164336
Missing scenery from Glenumbra (I still love the effect it gives):
Screenshot_20140302_204523
Missing door from Daggerfall’s cathedral:
Screenshot_20140302_214839
I managed to get into the Daggerfall bank’s safe with this bug: I could get past the safe walls before the scenery was loaded, but I couldn’t get out of it afterward! xD (By the way, you can’t loot it 🙁 )
Screenshot_20140302_215112
Again in Daggerfall bank, an open hole on the floor! I jumped in it, and got outside of the map. I loved it!
Screenshot_20140302_224430
Screenshot_20140302_224441

  • Some quests are buggy and can really stop your progression:
    • The Kill Abomination of Wrath step of the Unearthing the Past quest on Bethnik (from Daggerall Covenant) is one of them: it was really hard to make the abomination appear. Had to logout/relogin and try using the staff several times before the abomination appears. Apparently this was due to concurrency problems between players triggering the quest.
    • The Duel the Seamount Hunters step of the Prove Your Worth quest (still on Bethnik) is also buggy: when several players challenge the same Orc, 1 player can complete the quest, others don’t and they can’t ask the Orc for a new challenge. The workaround is logout/relogin and make sure to be alone when challenging the Orc.
  • It is impossible to trade with a player part of your group. The command just triggers nothing. This is quite annoying.
  • Once in a while you get past walls (fences, stairs…) and can get stuck in 3D models or in zones you are not supposed to be. It seems to appear when there is some lag. The solution is to either kill your character using /stuck or teleport (using wayshrines or friend players).
  • Sometimes when exiting dialogs with NPC, the UI is still frozen in dialog mode, controls do not respond anymore and you can’t neither talk with the NPC nor exit the dialog mode. The only ways I found to continue is logout/relogin or /reloadui command.
  • When entering a dungeon, your character is very often stuck in the floor (having just his upper body above). The glitch disappears after 30 secs waiting ; the character is then positioned correctly (Y-axis corrected).
  • Sometimes textures used in magical effects don’t load properly, and psychedelic colors are used instead. That’s a cool effect though 😉
  • Sometimes you encounter missing meshes here and there.

Screenshot_20140301_205239
Screenshot_20140301_205341

  • You sometimes encounter sliding horses in towns: they are moving but their posture stays still. I think they were moved by real players, but none were apparent on them.

Screenshot_20140303_003411

  • Horses again: when a player on a horse gets into his inventory or map, he appears standing on the horse back instead of staying sit.

Screenshot_20140302_215537

  • Some 3D models are lacking surfaces.

Screenshot_20140302_214738

  • I don’t know if this is a bug, but the Share command in the Journal does not trigger anything. I was expecting it to share the quest with other friends from my group (for them to catch up, see the exact same steps as me, and interact with the same quest objects), but could not get it to work.

That’s all I got. Happy debugging!

Elder Scrolls , , , , , , , , , , ,

Rails cluster with Ruby load balancer using Docker

Lately I discovered Docker.
I made a quick presentation on it for the rivierarb meetup of february 2014 (slides available).

As an example of Docker’s usage, I decided to make something cool: a Rails cluster, with a Ruby load balancer on top of it. I wanted to simulate a whole cluster of different machines (with their own IP and port) running the same Rails server, and an extra Ruby process that acts as a proxy to load balance the requests among the Rails servers.

And Docker made this simulation available in a single computer, very easily setup.

Setup

Here is how I did it.
Source files used can be seen in my rails-cluster-docker project on Github.

Create Docker images

First step was to create the Docker images: 1 for the Rails server, and 1 for the ruby proxy.

  1. I began by creating a Trusted Docker build based on my Github project docker-ruby. This made the image murielsalvan/ruby available, containing an Ubuntu Precise image with Ruby 2.1.0p0 installed.
    docker pull murielsalvan/ruby
    
  2. I then used this murielsalvan/ruby image to create a Docker container running a simple bash shell. I used it to install Rails and create a Rails app with a single page outputting its hostname and IP (this way each Rails server from my cluster will output different values). The source code of the Rails app can be found here. I then committed this container into a new image called murielsalvan/server, running the Rails server as a startup command, and opening port 3000.
    docker run -t -i murielsalvan/ruby bash
    docker commit -m="Test server" -author="Muriel Salvan <muriel@x-aeon.com>" -run='{"WorkingDir": "/root/server/", "Cmd": ["rails", "s"], "PortSpecs": ["3000"]}' acf566f7d155 murielsalvan/server
    
  3. I created a second container from murielsalvan/ruby with a bash shell to install a Ruby proxy (I used em-proxy: check it out, it is awesome!). The Ruby proxy takes a list of IP addresses as input, and will setup a load balancer (random strategy) among all those IPs on port 3000 (source code here). I then committed this container into a new image: murielsalvan/proxy, also opening port 3000.
    docker run -t -i murielsalvan/ruby bash
    docker commit -m="Proxy server" -author="Muriel Salvan <muriel@x-aeon.com>" -run='{"PortSpecs": ["3000"]}' 7d2431c16b14 murielsalvan/proxy
    

Run the Rails cluster

Once images are available, all we have to do is to run them in containers.
I wrote a small Ruby program to launch N Rails server’s containers (N being given as an argument) and outputting their IP once they are listening to their port 3000.
This script also binds the N container ports 3000 to host ports 5000+i. This way it is easy to check that each Rails container is working correctly by issuing wget -S -O - http://localhost:5000 commands to target each one of them and make sure they behave correctly without any proxy in front.

nbr_servers = ARGV[0].to_i

pipes_in = {}
nbr_servers.times do |idx|
  port = 5000 + idx
  pipe_cmd_in, pipe_cmd_out = IO.pipe
  cmd_pid = Process.spawn("docker run -p #{port}:3000 murielsalvan/server", :out => pipe_cmd_out, :err => pipe_cmd_out)
  puts "Launch server on port #{port}: PID=#{cmd_pid}"
  Process.detach(cmd_pid)
  pipe_cmd_out.close
  pipes_in[cmd_pid] = pipe_cmd_in
end
# Wait for all servers to be up
pipes_in.each do |pid, pipe_in|
  puts "Waiting for PID #{pid} to be listening..."
  found_info = false
  while !found_info
    out = pipe_in.readline.chomp
    puts out
    found_info = out.match(/WEBrick::HTTPServer/) != nil
    sleep 0.01 if !found_info
  end
end

puts 'All servers up and running.'

# Get their IP addresses
ips = []
`docker ps | sed -e 's/^\\(............\\).*$/\\1/' | tail -#{nbr_servers}`.split("\n").each do |container_id|
  ips << `docker inspect #{container_id} | grep IPAddress | sed -e 's/.*: \\"\\(.*\\)\\".*/\\1/g'`.chomp
end

puts ips.join(' ')

Here is the output obtained. Please note the IPs output at the end: those will be given to the proxy in the next step.

> ruby -w run_cluster.rb 5
Launch server on port 5000: PID=6559
Launch server on port 5001: PID=6561
Launch server on port 5002: PID=6565
Launch server on port 5003: PID=6571
Launch server on port 5004: PID=6573
Waiting for PID 6559 to be listening...
[2014-02-05 18:19:44] INFO  WEBrick 1.3.1
[2014-02-05 18:19:44] INFO  ruby 2.1.0 (2013-12-25) [x86_64-linux]
[2014-02-05 18:19:44] INFO  WEBrick::HTTPServer#start: pid=1 port=3000
Waiting for PID 6561 to be listening...
[2014-02-05 18:19:42] INFO  WEBrick 1.3.1
[2014-02-05 18:19:42] INFO  ruby 2.1.0 (2013-12-25) [x86_64-linux]
[2014-02-05 18:19:42] INFO  WEBrick::HTTPServer#start: pid=1 port=3000
Waiting for PID 6565 to be listening...
[2014-02-05 18:19:44] INFO  WEBrick 1.3.1
[2014-02-05 18:19:44] INFO  ruby 2.1.0 (2013-12-25) [x86_64-linux]
[2014-02-05 18:19:44] INFO  WEBrick::HTTPServer#start: pid=1 port=3000
Waiting for PID 6571 to be listening...
[2014-02-05 18:19:43] INFO  WEBrick 1.3.1
[2014-02-05 18:19:43] INFO  ruby 2.1.0 (2013-12-25) [x86_64-linux]
[2014-02-05 18:19:43] INFO  WEBrick::HTTPServer#start: pid=1 port=3000
Waiting for PID 6573 to be listening...
[2014-02-05 18:19:41] INFO  WEBrick 1.3.1
[2014-02-05 18:19:41] INFO  ruby 2.1.0 (2013-12-25) [x86_64-linux]
[2014-02-05 18:19:41] INFO  WEBrick::HTTPServer#start: pid=1 port=3000
All servers up and running.
172.17.0.16 172.17.0.14 172.17.0.15 172.17.0.13 172.17.0.12

Run the Ruby proxy

Here again, a small Ruby program can help us:

lst_ips = ARGV.clone
Process.wait(Process.spawn("docker run -p 3000:3000 -t murielsalvan/proxy ruby -w /root/run_proxy.rb #{lst_ips.join(' ')}"))

Here is the output:

> ruby -w run_proxy.rb 172.17.0.16 172.17.0.14 172.17.0.15 172.17.0.13 172.17.0.12
/root/run_proxy.rb:149: warning: `&' interpreted as argument prefix
/root/run_proxy.rb:150: warning: `&' interpreted as argument prefix
/root/run_proxy.rb:151: warning: `&' interpreted as argument prefix
/root/run_proxy.rb:152: warning: `&' interpreted as argument prefix
/usr/local/lib/ruby/gems/2.1.0/gems/em-proxy-0.1.8/lib/em-proxy/backend.rb:37: warning: method redefined; discarding old debug
/usr/local/lib/ruby/gems/2.1.0/gems/em-proxy-0.1.8/lib/em-proxy/connection.rb:126: warning: method redefined; discarding old debug
/root/run_proxy.rb:168: warning: method redefined; discarding old stop
/usr/local/lib/ruby/gems/2.1.0/gems/em-proxy-0.1.8/lib/em-proxy/proxy.rb:17: warning: previous definition of stop was here
Launching proxy at 0.0.0.0:3000...

And now our proxy is listening to port 3000 (with tons of warnings… maybe em-proxy would need some clean-up 😉 ).

Unleash the requests!

Time to jump on our browser and target http://localhost:3000 to see if our requests target different hostnames and IPs. Don’t forget to clear the cache between your requests to make sure they are sent to your proxy.

Here is the output of 2 requests: we can see clearly that 2 different Rails instances were targeted.

Test1

Aaaaaand… REFRESH!

Test2

Hooray! A simple setup giving a complete Rails clustering solution, tested locally on our host.

Personnally, I managed to make the whole run on an Ubuntu 14.04 Alpha inside a VirtualBox from my Windows 7 64b host, and performance was quite acceptable (less than 1 sec per request)!

Enjoy

Muriel

Note: You can read this article in Chinese thanks to Liu Bin!

Howto, Ruby, Ruby on Rails, Web development , , , , , , , , , ,

Install Ruby 1.9.3 on a shared hosting non root

I’ve got through a bit of a hurdle to get Ruby 1.9.3 installed on my shared host.
My host is PlanetHoster, but this walkthrough should work with any host giving you a decent development suite (gcc, ld, make…), like 1and1, OVH…

This is how I did it:

  1. Get libyaml from LibYAML site, as it is a dependency for Ruby. Then compile it and install it locally.
    > mkdir libyaml
    > cd libyaml
    > wget http://pyyaml.org/download/libyaml/yaml-0.1.4.tar.gz
    > tar xvzf yaml-0.1.4.tar.gz
    > cd yaml-0.1.4
    > ./configure --prefix=/your/home/libyaml/yaml-0.1.4-install
    > make
    > make install
    
  2. Get Ruby from its sources in a local directory on your account. Then compile it and install it with the path to previously installed library.
    > mkdir ruby-1.9.3
    > cd ruby-1.9.3
    > wget http://cache.ruby-lang.org/pub/ruby/1.9/ruby-1.9.3-p484.tar.gz
    > tar xvzf ruby-1.9.3-p484.tar.gz
    > cd ruby-1.9.3-p484
    > ./configure --prefix=/your/home/ruby-1.9.3/ruby-1.9.3-p484-install --with-opt-dir=/your/home/libyaml/yaml-0.1.4-install
    > make
    > make install
    
  3. Add Ruby to your PATH. Set this line in your .bashrc if you want it to be definitive.
    > export PATH="/your/home/ruby-1.9.3/ruby-1.9.3-p484-install/bin:${PATH}"
    

And that’s all: you’ve got a fully running Ruby installation without root access:

> ruby -v
ruby 1.9.3p484 (2013-11-22 revision 43786) [x86_64-linux]
> gem -v
1.8.23

Enjoy!

Howto, Ruby, Web development , , , , , , ,

Serialize Ruby objects: ruby-serial

Many times I have come across the need to serialize a whole bunch of Ruby objects, with all their references.
This is often useful to save the state of a program at one point, and retrieve it later in another session.

Then I looked for a solution which could guarantee the following:

  • Serialize directly Ruby objects, without having to convert/copy them to a specific format (no ORM, just native API).
  • Be efficient enough to handle a lot of objects (either big objects or a ton of smaller ones). Namely several hundreds of Mb of data.
  • Serialize user-made objects (not just native types).
  • Serialize/deserialize using the same format in different Ruby versions.
  • Be backward compatible when new serialization versions come out.
  • Be optimized enough to not serialize twice objects that are shared among several Ruby objects.
  • Be able to deserialize shared objects without duplicating them (keep references, don’t memory copy).

And I could not find a simple solution to handle that.
Most of the serialization libraries I found either

  • require a JSON/YAML kind of data conversion (and mem copy),
  • were not compatible across Ruby versions (yes I’m looking at you Marshal),
  • or were wasting space and memory by keeping a human-readable format.

So I decided to create one using what I found best in other solutions: ruby-serial.

Basically, ruby-serial is using the great MessagePack serialization library to encode on-the-fly Ruby objects (without mem copy) by simulating a JSON-like structure for user-made objects and shared object references.

Its API is quite straight-forward (same as Marshal) and can be customized easily.
Here is an example of its installation and usage:

> gem install ruby-serial
require 'ruby-serial'

# Create example
class User
  attr_accessor :name
  attr_accessor :comment
  def ==(other)
    other.is_a?(User) and (@name == other.name) and (@comment == other.comment)
  end
end
shared_obj = 'This string instance will be shared'
user = User.new
user.name = 'John'
user.comment = shared_obj # shared_obj is referenced here
obj = [
  'My String',
  shared_obj, # shared_obj is also referenced here
  1,
  user
]
 
# Get obj as a serialized String
serialized_obj = RubySerial::dump(obj)

# Get back our objects from the serialized String
deserialized_obj = RubySerial::load(serialized_obj)

# Both objects are the same
puts "Same? #{obj == deserialized_obj}"
# => true

# The shared object is still shared!
puts "Shared? #{deserialized_obj[1].object_id == deserialized_obj[3].comment.object_id}"
# => true

Currently ruby-serial is still young, and may lack some features.
It is under active development, so feel free to report any problem you may find in using it.

Complete documentation is accessible here. RDoc here.

Contributions are highly welcomed!

Enjoy!

Uncategorized

A quick message queue benchmark: ActiveMQ, RabbitMQ, HornetQ, QPID, Apollo…

Lately I performed a message queue benchmark, comparing several queuing frameworks (RabbitMQ, ActiveMQ…).
Those benchmarks are part of a complete study conducted by Adina Mihailescu, and everything was presented at the April 2013 riviera.rb meet-up. You should definitely peek into Adina’s great presentation available online right here.

Setup and scenarios

So I wanted to benchmark brokers, using different protocols: I decided to build a little Rails application piloting a binary that was able to enqueue/dequeue items taken from a MySQL database.

Setup

I considered the following scenarios:

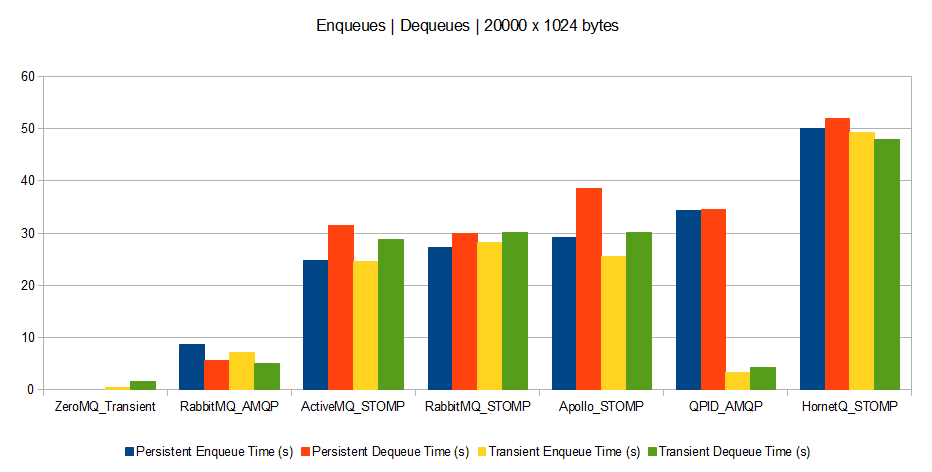
  • Scenario A: Enqueuing 20,000 messages of 1024 bytes each, then dequeuing them afterwards.
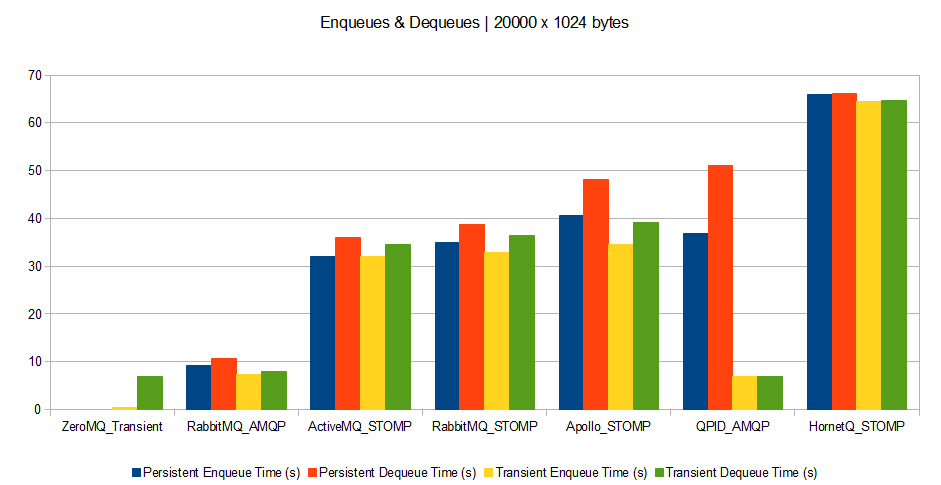
  • Scenario B: Enqueuing and dequeuing simultaneously 20,000 messages of 1024 bytes each.
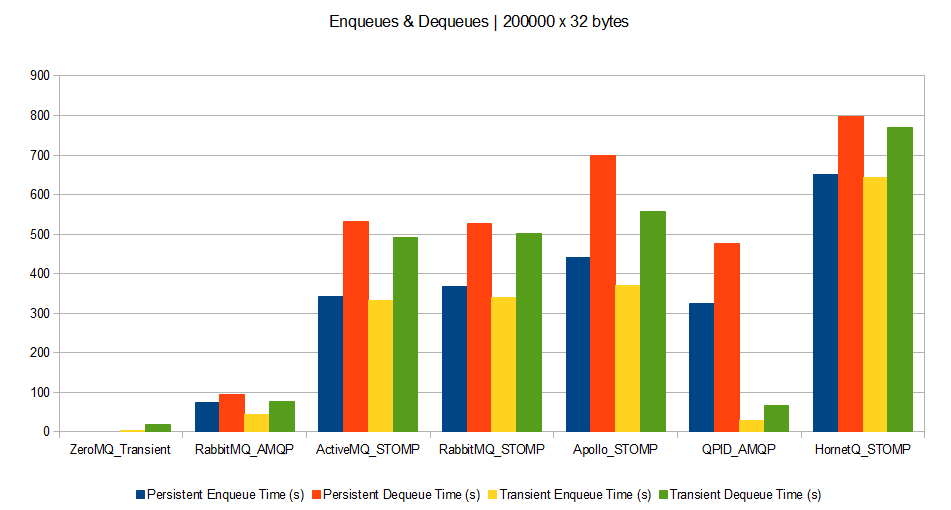
  • Scenario C: Enqueuing and dequeuing simultaneously 200,000 messages of 32 bytes each.
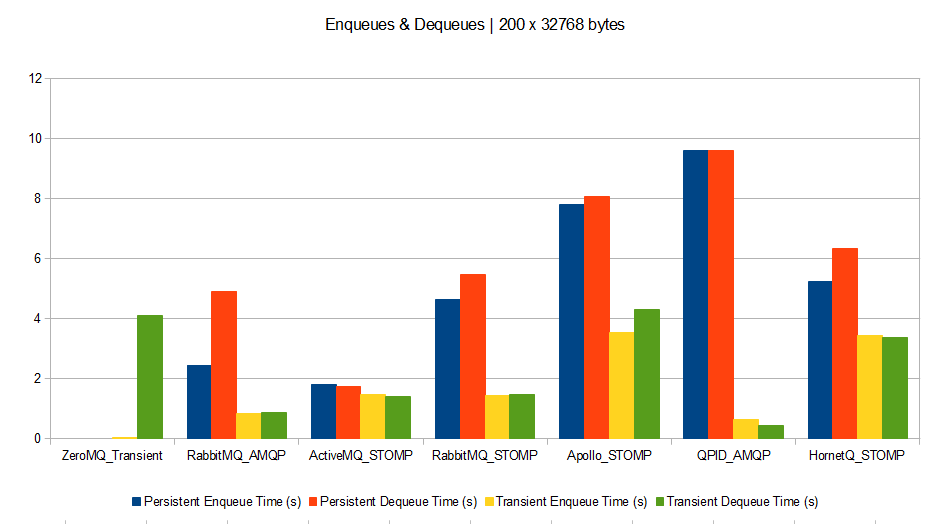
  • Scenario D: Enqueuing and dequeuing simultaneously 200 messages of 32768 bytes each.

For each scenario, 1 process is dedicated to enqueuing, and another one is dedicated to dequeuing.

I measured the time spent by each enqueuing and dequeuing process, with 2 different broker configurations:

  1. Using persistent queues and messages (when the broker is down and back up, queues are still containing items).
  2. Using transient queues and messages (no persistence: when broker is down, queues and items are lost).

I decided to bench the following brokers:

The tests were run on a single laptop with this configuration:

  • Model: Dell Studio 1749
  • CPU: Intel Core i3 @ 2.40 GHz
  • RAM: 4 Gb
  • OS: Windows 7 64 bits
  • Ruby 1.9.3p392
  • Java 1.7.0_17-b02
  • Ruby AMQP client gem: amqp 0.9.10
  • Ruby STOMP client gem: stomp 1.2.8
  • Ruby ZeroMQ gem: ffi-rzmq 1.0.0

Apart from declaring the testing queues in some brokers’ configuration and the persistence settings, all brokers were running with their default configuration out of the box (no tuning made).

You can find all the source code used to perform those benchmarks here on github.

Results

And now, the results (processing time measured in seconds: the lower the better).

Scenario A

ScenarioA

Scenario B

ScenarioB2

Scenario C

ScenarioC2

Scenario D

ScenarioD2

Here are the results data sheet for those who are interested: Benchmarks

What can we say about it?

The benchmark setup being simple (just 1 host, using dedicated queues with 1 enqueuer and 1 dequeuer each, no special performance or configuration tuning), the results will just give us a first estimation of performance. More complex scenarios will need more complex setups to draw final thoughts.
However a few trends seem to appear:

  • Brokers perform much better with bigger messages. Therefore if your queuing clients can support grouping their messages, this is a win. However grouped messages could not be spread across parallel consumers.
  • Persistence drawbacks (disk or db accesses) appear when brokers deal with big messages (except for QPID which is very efficient for transient messages whatever the size). This means that for small and medium messages, time is spent on processing rather than on I/O.
  • ZeroMQ broker outperforms all others. This means that unless you have a need for complex broker features, ZeroMQ is a perfect message dispatcher among processes.
  • QPID seems to be the best at performing without persistence.
  • It seems AMQP protocol is much more optimized than STOMP (at least judging with RabbitMQ’s results). However this might be due to a badly coded Ruby STOMP client, or a badly coded STOMP implementation on RabbitMQ’s side.
  • HornetQ seems bad at dealing with small and medium messages, compared to others.
  • Except for big messages, RabbitMQ seems to be the best bet as it outperforms others by a factor of 3.
Benchmark, Ruby, Ruby on Rails , , , , , , , , , , , , , , ,

Monitor your systems using Monit on shared hosts non-root – Example with Rails3/Capistrano

Do you know Monit? You definitely should. This is a high-quality and mature Open Source project, very well documented, that can monitor all your system resources (global and process-based). It is lightweight, efficient, can take corrective actions (restart servers…), provides real-time web interface, sends alerts, and is so easy to install and to use.

Now that pitching is done, I will show you how to install it and configure it to monitor a Rails application running on Unicorn, deployed using Capistrano and on shared web host having no root privileges.

  1. Install Monit on your production environment
  2. Configure Monit to monitor a Rails3/Unicorn process
  3. Run Monit and check everything runs fine
  4. Integrate it in Capistrano deployments

Install Monit on your production environment

First things first: the installation of Monit on the production environment.

  1. Download Monit source files from Monit site, and upload them to your production environment.
  2. Deflate it in a repository, then apply the common GNU compilation and installation methods. Do not forget to specify the path to the ./configure script with --prefix option: it will be the installation destination.
    tar xvzf monit-5.5.tar.gz
    cd monit-5.5
    ./configure --prefix=/home/myuser/monit
    make
    make install
    
  3. Add the binary folder of monit to your PATH variable. This can be done in a startup file such as ~/.bashrc:
    export PATH=${PATH}:/home/myuser/monit/bin
    
  4. Test your Monit installation by invoking the Monit binary:
    > monit -V
    This is Monit version 5.5
    Copyright (C) 2001-2012 Tildeslash Ltd. All Rights Reserved.
    

Configure Monit to monitor a Rails3/Unicorn process

Monit uses generally the file .monitrc as a configuration file. Here we check how to set directives in it to monitor a running Rails 3 application above a Unicorn server.
The Rails 3 application is running from “/home/myuser/myapp/current” in our examples (deployed from Capistrano).

Monit provides by default a very well documented configuration file named monitrc in the directory where you deflated the source files. You should copy it to .monitrc and then modify it to your needs.

  1. Set Monit process to run as a daemon, waking up every minute:
    set daemon  60
    
  2. Write a log file. This log will then be accessible from the web interface.
    set logfile /home/myuser/log_monit
    
  3. Set a mail SMTP server to send alerts (can be localhost if your mail runs locally):
    set mailserver my_smtp_server.com               # primary mailserver
        username monit@my_site.com password "Password"
    
  4. Set the originator of emails sent by Monit:
    set mail-format { from: monit@my_site.com }
    
  5. Set the receiver of alerts:
    set alert admin@my_site.com
    
  6. Setup a running web interface on a given port (here 12007), and set HTTP authentication on it.
    set httpd port 12007 and
        allow admin:"monit"      # require user 'admin' with password 'monit'
    
  7. Monitor your Rails application using the Unicorn PID file: give commands to start and stop it, eventually monitor some resources.
    check process my_rails_app with pidfile /home/myuser/myapp/shared/pids/unicorn.pid
      start program = "/home/myuser/myapp/unicorn_script.sh start" with timeout 60 seconds
      stop program = "/home/myuser/myapp/unicorn_script.sh stop"
      if totalcpu is greater than 50% for 5 cycles then alert
      if totalmemory is greater than 5% then restart
    
    
  8. Write the unicorn_script.sh script to start and stop Unicorn server. Here is an example of such file. Adapt it to your needs. Do not forget to set all your needed environment variables in it as the Monit daemon will later be invoked using Capistrano remotely, and environment will not be set (.bashrc file won’t be sourced).
    #!/bin/bash
    
    # Set the environment, as required by Monit
    export PATH="/home/myuser/bin:/home/myuser/ruby/gems/bin:/home/myuser/monit/bin:${PATH}"
    export RUBYOPT="${RUBYOPT} -I/home/myuser/rubygems/inst/lib"
    export GEM_PATH="/home/myuser/ruby/gems:/usr/lib/ruby/gems/1.8"
    export GEM_HOME="/home/myuser/ruby/gems"
    
    start () {
      cd /home/myuser/myapp/current
      BUNDLE_GEMFILE=/home/myuser/myapp/current/Gemfile bundle exec unicorn -c /home/myuser/myapp/current/config/unicorn/production.rb -E production -D
    }
    
    stop () {
      kill -s QUIT $(cat /home/myuser/myapp/shared/pids/unicorn.pid)
    }
    
    case $1 in
      start)
        start
      ;;
      stop)
        stop
      ;;
      *)
      echo $"Usage: $0 {start|stop}"
      exit 1
      ;;
    esac
    
    exit 0
    
  9. Test that your configuration file is ok by running Monit:
    > monit -t
    Control file syntax OK
    

    If an error occurs, investigate and correct it before continuing.

Run Monit and check everything runs fine

  1. Run Monit:
    > monit
    

    Pretty simple, he?

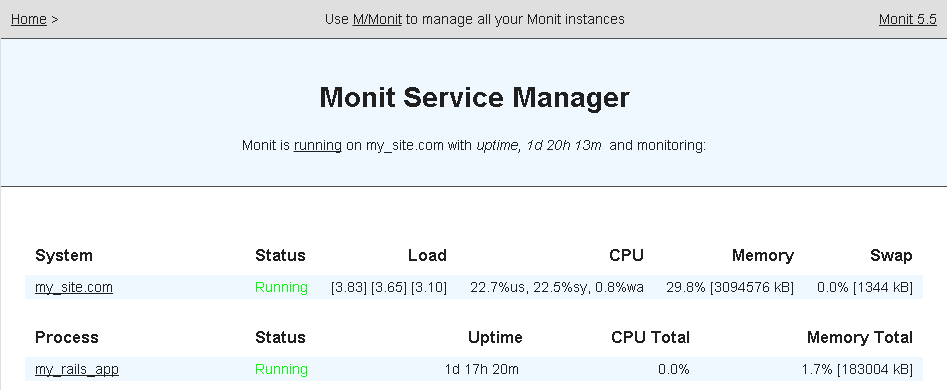
  2. Check the web interface, listening on port 12007 in this example (http://my_site.com:12007). It will first prompt you for the user name and password you have set in ~/.monitrc.

    Monit

Integrate it in Capistrano deployments

Now that Monit monitors your Rails application, it is important to stop monitoring during the restart of the server and restart monitoring afterwards. This is easily integrated into Capistrano.

In your Capistrano deploy file, just add the following at the end:

# Monit tasks
namespace :monit do
  task :start do
    run 'monit'
  end
  task :stop do
    run 'monit quit'
  end
end

# Stop Monit during restart
before 'unicorn:restart', 'monit:stop'
after 'unicorn:restart', 'monit:start'

If you are not using Unicorn, replace 'unicorn:restart' with 'deploy:restart', and you should be set.

That’s it!
You should really take a deep look into the commented Monit configuration file and Monit documentation, as you will find real treasures to monitor on your system.

Howto, Monitoring, Ruby on Rails, Web development , , , , , , , , , , , , ,

Deploy Rails 3 Unicorn applications using Capistrano on a shared web host non-root

In my struggle to have complete Rails3 environments setup in shared web hosts, the deployment step was missing. Lately I managed to deploy Rails3 Unicorn applications using Capistrano on a shared web host, as a non-root user with very limited privileges (jailshell). So I decided to share this with you.

  1. Setup a Git repository to deploy source files
  2. Install Capistrano
  3. Adapt Unicorn configuration
  4. Deploy your application
  5. Useful links

For information, here are the versions used:

  • On my development host (from where I issue cap commands) [Windows 7 64bits]:
    • Ruby: 1.9.3p194
    • RubyGems: 1.8.24
    • Bundler: 1.2.4
    • Rails: 3.2.12
    • Capistrano: 2.14.2
    • capistrano-unicorn: master branch from GitHub repository
  • On my production environment [Linux i686]:
    • Ruby: 1.8.7p370
    • RubyGems: 1.6.2
    • Bundler: 1.2.4
    • Unicorn: 4.6.0

Here are some prerequisites for this tutorial:

  • The production environment is accessed using SSH.
  • The production host provides a development environment (cc, ld, make).
  • We will push our code to the production host using Git.
  • If git is not installed on your production host, you can download the sources here as a Zip file, then compile and install it in your production user home space. No need to be root.

For the sake of this tutorial, the production host is called “mysite.com”, the SSH connection is made on port “1234”, the user running everything is named “myuser”. The Rails3 application is called “myapp”, it is present on development host in “/path/to/myapp”, and will be pushed on our production host in “/home/myuser/myapp.git” and deployed in “/home/myuser/myapp_deployed” directories. Prompts made on the production host begin with “[@production”, whereas the ones on the development (local) host begin with “[@development”.

Here are all the steps:

Setup a Git repository to deploy source files

First thing is to setup a git repository on the remote production host. This repository will then be accessed using SSH to push files, then Capistrano will pull from it to deploy your Rails3 application.

  1. Initialize a bare Git repository on production host:
    [@production:/home/myuser]> mkdir myapp.git
    [@production:/home/myuser]> cd myapp.git
    [@production:/home/myuser]> git init --bare
    

    This repository will then be accessible using URL ssh://myuser@mysite.com:1234/home/myuser/myapp.git

  2. Setup your local Git repository to push to this remote one.:
    [@development:/path/to/myapp]> git remote add production ssh://myuser@mysite.com:1234/home/myuser/myapp.git
    

Install Capistrano

  1. Add capistrano and capistrano-unicorn gems in your Gemfile
  2. . For the time of this writing, capistrano-unicorn gem has to be fetch from its GitHub repository, as released version (0.1.6) is buggy.

    gem 'jquery-rails'
    gem 'prototype-rails'
    
    group :development do
      gem 'meta_request', '0.2.0'
      gem 'sqlite3'
    
      # Capistrano stuff
      gem 'capistrano'
      gem 'capistrano-unicorn', :git => 'https://github.com/sosedoff/capistrano-unicorn.git', :branch => 'master', :require => false 
    end
    
    group :production do
      gem 'unicorn'
      gem 'mysql2'
    

    Putting those in the :development group is enough as production environment won’t need them.

  3. Run bundle install to install those new gems.
  4. Run capify . to capify you Rails3 application. This will create 2 files: Capfile and config/deploy.rb.
  5. Edit the generated Capfile file to uncomment the line related to assets pipeline. This will define additional code for Capistrano to precompile assets when deploying in production.
    load 'deploy'
    # Uncomment if you are using Rails' asset pipeline
    load 'deploy/assets'
    load 'config/deploy' # remove this line to skip loading any of the default tasks
    
  6. If your development and production platforms are different (MacOS/Linux/Windows): edit your .gitignore file and make sure that Gemfile.lock is part of it.. The reason is simple: Bundler is not meant to be cross-platform (see this bug report). Some of the gems you bundle from your development host won’t be the same on your production host. Therefore we don’t want to deploy Gemfile.lock on our production platform: it will be generated with a nice bundle install made by Capistrano.
    # Ignore private files
    private
    
    # No Gemfile.lock as dev and prod platforms are not the same
    Gemfile.lock
    
  7. Edit file config/deploy.rb, and adapt it to your needs. Here are the considerations to take into account:
    • Add require 'bundler/capistrano': It will add tasks needed to issue Bundler commands.
    • Set your application name.
      set :application, 'My application'
      
    • Set your SSH configuration. This includes your SSH username, SSH connection port, directive to not use sudo, and terminal type.
      set :user, 'myuser'
      ssh_options[:port] = 1234
      set :use_sudo, false
      default_run_options[:pty] = true
      
    • Setup environment variables: Beware that if you tuned some environment variables in your SSH sessions to use locally installed gems or binaries, SSH connections made by Capistrano might not have them. You can set them this way.
      set :default_environment, { 
        'PATH' => '/home/myuser/bin:/home/myuser/ruby/gems/bin:/usr/local/bin:/bin:/usr/bin',
        'RUBYOPT' => '-I/home/myuser/rubygems/inst/lib',
        'GEM_PATH' => '/home/myuser/ruby/gems:/usr/lib/ruby/gems/1.8',
        'GEM_HOME' => '/home/myuser/ruby/gems'
      }
      
    • Setup the Git repository location. Here we specify the production repository URL, accessed from the local development environment using :local_repository and from the production environment using :repository.
      # Source repository taken for deployments
      set :local_repository,  'ssh://myuser@mysite.com:1234/home/myuser/myapp.git'
      set :repository, '/home/myuser/myapp.git'
      set :scm, :git # You can set :scm explicitly or Capistrano will make an intelligent guess based on known version control directory names
      # Or: `accurev`, `bzr`, `cvs`, `darcs`, `git`, `mercurial`, `perforce`, `subversion` or `none`
      
    • If your development and production platforms are different (MacOS/Linux/Windows): Set bundler flags manually to not include default --deployment. By default, Capistrano will bundle install using the --deployment flag, expecting a Gemfile.lock to be present. As we want it to be regenerated, we have to force the bundler flags without this one.
      set :bundle_flags, ''
      
    • Set the deployment directory:
      set :deploy_to, '/home/myuser/myapp_deployed'
      
    • Set your production server for all the roles.
      role :web, 'mysite.com'                          # Your HTTP server, Apache/etc
      role :app, 'mysite.com'                          # This may be the same as your `Web` server
      role :db,  'mysite.com', :primary => true # This is where Rails migrations will run
      
    • At the end of the file, add the Unicorn specific tasks. It is important to require the ‘capistrano-unicorn’ gem after previous directives, as it can overwrite some variables you have set previously 🙁
      # Unicorn tasks
      require 'capistrano-unicorn'
      after 'deploy:restart', 'unicorn:reload' # app IS NOT preloaded
      after 'deploy:restart', 'unicorn:restart'  # app preloaded
      

    Here is an example of a complete deploy.rb file:

    require 'bundler/capistrano'
    
    set :application, 'My application'
    
    # SSH configuration
    set :user, 'myuser'
    set :use_sudo, false
    ssh_options[:port] = 1234
    default_run_options[:pty] = true
    set :default_environment, { 
      'PATH' => '/home/myuser/bin:/home/myuser/ruby/gems/bin:/usr/local/bin:/bin:/usr/bin',
      'RUBYOPT' => '-I/home/myuser/rubygems/inst/lib',
      'GEM_PATH' => '/home/myuser/ruby/gems:/usr/lib/ruby/gems/1.8',
      'GEM_HOME' => '/home/myuser/ruby/gems'
    }
    
    # Source repository taken for deployments
    set :local_repository,  'ssh://myuser@mysite.com:1234/home/myuser/myapp.git'
    set :repository, '/home/myuser/myapp.git'
    set :scm, :git # You can set :scm explicitly or Capistrano will make an intelligent guess based on known version control directory names
    # Or: `accurev`, `bzr`, `cvs`, `darcs`, `git`, `mercurial`, `perforce`, `subversion` or `none`
    set :bundle_flags, ''
    
    # Destination of deployments
    set :deploy_to, '/home/myuser/myapp_deployed'
    # set :deploy_via, :copy
    
    role :web, 'mysite.com'                          # Your HTTP server, Apache/etc
    role :app, 'mysite.com'                          # This may be the same as your `Web` server
    role :db,  'mysite.com', :primary => true # This is where Rails migrations will run
    
    # if you want to clean up old releases on each deploy uncomment this:
    after 'deploy:restart', 'deploy:cleanup'
    
    # if you're still using the script/reaper helper you will need
    # these http://github.com/rails/irs_process_scripts
    
    # If you are using Passenger mod_rails uncomment this:
    # namespace :deploy do
    #   task :start do ; end
    #   task :stop do ; end
    #   task :restart, :roles => :app, :except => { :no_release => true } do
    #     run "#{try_sudo} touch #{File.join(current_path,'tmp','restart.txt')}"
    #   end
    # end
    
    # Unicorn tasks
    require 'capistrano-unicorn'
    after 'deploy:restart', 'unicorn:reload' # app IS NOT preloaded
    after 'deploy:restart', 'unicorn:restart'  # app preloaded


Adapt Unicorn configuration

With our application deployed using Capistrano, the deployed application path on our production host is “/home/myuser/myapp_deployed/current”. Capistrano also requires the unicorn.rb configuration file to be by default in “config/unicorn/production.rb”. So here are a few changes to do.

  1. Move your unicorn configuration file:
    [@development:/path/to/myapp]> mkdir config/unicorn
    [@development:/path/to/myapp]> mv config/unicorn.rb config/unicorn/production.rb
    
  2. Adapt unicorn configuration with the new deployed path. This has to be adapted to your specific configuration needs.
    # Production specific settings
    if env == "production"
      # Help ensure your application will always spawn in the symlinked
      # "current" directory that Capistrano sets up.
      working_directory '/home/myuser/myapp_deployed/current'
     
      # feel free to point this anywhere accessible on the filesystem
      user 'myuser', 'mygroup'
      shared_path = '/home/myuser/myapp_deployed/current'
     
      stderr_path '/home/myuser/myapp_deployed/current/log/unicorn.stderr.log'
      stdout_path '/home/myuser/myapp_deployed/current/log/unicorn.stdout.log'
    end
    

Deploy your application

In this section, commands run should deploy your application. For each command, check the output in detail and do not issue next commands if you encounter errors with previous ones. In case of errors, investigation and correction is needed before continuing.

  1. Commit modified files in your local Git repository.
    [@development:/path/to/myapp]> git add -A
    [@development:/path/to/myapp]> git commit -m"Added Capistrano support for mysite.com"
    
  2. Push your repository to your production host
    [@development:/path/to/myapp]> git push production master
    
  3. Setup Capistrano for its first time use. This step is not needed for subsequent deploys.
    [@development:/path/to/myapp]> cap deploy:setup
    [@development:/path/to/myapp]> cap deploy:check
    

    If you get the error cannot load such file -- capistrano-unicorn (LoadError), using the bundle exec command in front of all your cap commands:

    [@development:/path/to/myapp]> bundle exec cap deploy:setup
    [@development:/path/to/myapp]> bundle exec cap deploy:check
    
  4. Deploy using Capistrano:
    [@development:/path/to/myapp]> cap deploy
    

    If you have database migrations to be run, use the following instead:

    [@development:/path/to/myapp]> cap deploy:migrations
    

And that’s it! You should have your running Unicorn server on your production host, installed in /home/myuser/myapp_deployed/current.

Subsequent deploys can be performed, following the same commands from your development host only:

[@development:/path/to/myapp]> git add -A
[@development:/path/to/myapp]> git commit -m"New commit"
[@development:/path/to/myapp]> git push production master
[@development:/path/to/myapp]> bundle exec cap deploy:migrations

Useful links

In case of problems, here are some links that helped me a lot in setting this up:

Git, Howto, Ruby on Rails, Web development , , , , , , , , , , ,

Installing Rails 3 nginx unicorn on a shared web host non-root

Lately I tried to install a complete Rails 3 nginx unicorn web stack on a shared host without root privileges, in my user home directory.

  1. Ruby and Rails3 setup
  2. nginx setup
  3. Unicorn setup
  4. Unicorn setup with nginx

In this process, here are the software versions used:

  • Ruby: 1.8.7 p370
  • RubyGems: 1.6.2
  • Rails: 3.2.12
  • nginx: 1.2.7
  • Unicorn: 4.5.0

For info, I tested this setup successfully on a PlanetHoster’s shared web host.

In this tutorial, the user account is named “myuser”, belonging to the group “mygroup”. The web server (nginx) will run as this user (non-root), therefore in on a port number >1024 (I chose 12006). The Rails3 application is named “myapp”, and is accessible using the external url “http://my_public_url.com”

Before beginning, it is important to make sure development tools (at least gcc, ld and make) are available on the shared web host environment, and that you have an SSH access to your web host.

Here are the steps to get it running:

Ruby and Rails3 setup

  1. Setup your RubyGems config to install gems locally in your home directory (if not already done).
    This is done first by setting a few environment variables:

    export GEM_PATH="/home/myuser/gems:/usr/lib/ruby/gems/1.8"
    export GEM_HOME="/home/myuser/gems"
    export PATH="/home/myuser/gems/bin:${PATH}"
    

    This will tell RubyGems to install gems in the /home/myuser/gems directory, and to use Gems’ binaries from your local installation first.
    Eventually create the /home/myuser/gems directory.
    Then edit RubyGems configuration file to set Gem files installation local (this will be useful to be used using bundler later):

    ---
    gem: --local --run-tests
    gemhome: /home/myuser/gems
    gempath: []
    
    rdoc: --inline-source --line-numbers
    
  2. Install Rails3:
    gem install rails
    

    This will install all gems in your local /home/myuser/gems directory.

  3. Get your Rails3 application code in a local directory, or create a new one using rails new myapp in a directory. In my tutorial, the app is in /home/myuser/rails_apps/myapp.
  4. Install all gems needed by your Rails3 application using bundler from your application directory (/home/myuser/rails_apps/myapp):
    bundle install
    
  5. Setup your Rails3 application: database connection, configuration…
  6. Test your application by running it using the default webrick server:
    rails s -e production -p 12006
    

    You should be able to see your Rails application running using top (in another terminal):

    > top -u myuser -c
    top - 12:52:21 up 64 days,  9:37,  2 users,  load average: 2.47, 2.54, 2.64
    Tasks: 310 total,   2 running, 307 sleeping,   0 stopped,   1 zombie
    Cpu(s): 11.4%us,  2.7%sy,  0.6%ni, 77.8%id,  7.3%wa,  0.0%hi,  0.1%si,  0.0%st
    Mem:  10376292k total,  8649296k used,  1726996k free,   432028k buffers
    Swap:  5406712k total,     1220k used,  5405492k free,  5260176k cached
    
      PID USER      PR  NI  VIRT  RES  SHR S %CPU %MEM    TIME+  COMMAND
    26747 myuser    21   0  2596 1096  732 R  1.9  0.0   0:00.02 top -u myuser -c
    25523 myuser    15   0 33212  26m 3872 S  0.0  0.3   0:01.69 /usr/bin/ruby script/rails s -e production -p 12006
    

    You should also be able to see your Rails3 application running at your external URL, on port 12006 (for example http://my_public_url.com:12006).
    Once this is checked, you can stop your Rails3 webrick server. We will now use nginx and Unicorn to make it running.

nginx setup

  1. Install nginx in a local directory, grabbing it first from nginx downloads (check nginx download page to get the latest version URL.
    mkdir ~/nginx
    cd ~/nginx
    wget http://nginx.org/download/nginx-1.2.7.tar.gz
    tar xvzf nginx-1.2.7.tar.gz
    cd nginx-1.2.7
    ./configure --prefix=/home/myuser/nginx/nginx-1.2.7-install --user=myuser --group=mygroup --with-http_ssl_module
    make
    make install
    

    This has installed nginx in directory /home/myuser/nginx/nginx-1.2.7-install

  2. Modify nginx configuration file for it to run on a port >1024.
        keepalive_timeout  65;
    
        #gzip  on;
    
        server {
            listen       12006;
            server_name  localhost;
    
            #charset koi8-r;
    
            #access_log  logs/host.access.log  main;
    
  3. Test nginx works correctly by running it from its installation directory /home/myuser/nginx/nginx-1.2.7-install:
    ./sbin/nginx
    

    Now you should see a master and worker processes running using top:

    > top -u myuser -c
    top - 12:31:02 up 64 days,  9:16,  2 users,  load average: 3.17, 2.80, 2.67
    Tasks: 314 total,   4 running, 310 sleeping,   0 stopped,   0 zombie
    Cpu(s): 16.2%us, 22.0%sy,  0.0%ni, 39.0%id, 22.6%wa,  0.0%hi,  0.2%si,  0.0%st
    Mem:  10376292k total,  8240012k used,  2136280k free,   472592k buffers
    Swap:  5406712k total,     1220k used,  5405492k free,  4849432k cached
    
      PID USER      PR  NI  VIRT  RES  SHR S %CPU %MEM    TIME+  COMMAND
     5033 myuser    18   0  2600 1240  836 R  0.7  0.0   0:00.03 top -u myuser -c
    12718 myuser    25   0  5860  700  336 S  0.0  0.0   0:00.00 nginx: master process ./sbin/nginx
    12720 myuser    15   0  6084 1136  568 S  0.0  0.0   0:00.00 nginx: worker process
    

    You can already access your server externally using its port (here: 12006): you should see nginx welcoming page (for example at http://my_public_url.com:12006).
    nginx
    Once this is checked, you can shutdown nginx server by issuing:

    ./sbin/nginx -s stop
    

Unicorn setup

  1. Add the unicorn gem to your Rails application’s Gemfile
    source 'https://rubygems.org'
    gem 'rails', '3.2.12'
    gem 'unicorn'
    
  2. Install the unicorn gem from your application’s directory:
    bundle install
    
  3. Create the Unicorn configuration file in your Rails’ application config/unicorn.rb (adapt it to your needs in highlighted lines):
    # config/unicorn.rb
    # Set environment to development unless something else is specified
    env = ENV["RAILS_ENV"] || "development"
    
    # See http://unicorn.bogomips.org/Unicorn/Configurator.html for complete
    # documentation.
    worker_processes 4
    
    # listen on both a Unix domain socket and a TCP port,
    # we use a shorter backlog for quicker failover when busy
    listen "/home/myuser/rails_apps/myapp/tmp/my_site.socket", :backlog => 64
    
    # Preload our app for more speed
    preload_app true
    
    # nuke workers after 30 seconds instead of 60 seconds (the default)
    timeout 30
    
    pid "/home/myuser/rails_apps/myapp/tmp/unicorn.my_site.pid"
    
    # Production specific settings
    if env == "production"
      # Help ensure your application will always spawn in the symlinked
      # "current" directory that Capistrano sets up.
      working_directory "/home/myuser/rails_apps/myapp"
    
      # feel free to point this anywhere accessible on the filesystem
      user 'myuser', 'mygroup'
      shared_path = "/home/myuser/rails_apps/myapp"
    
      stderr_path "#{shared_path}/log/unicorn.stderr.log"
      stdout_path "#{shared_path}/log/unicorn.stdout.log"
    end
    
    before_fork do |server, worker|
      # the following is highly recomended for Rails + "preload_app true"
      # as there's no need for the master process to hold a connection
      if defined?(ActiveRecord::Base)
        ActiveRecord::Base.connection.disconnect!
      end
    
      # Before forking, kill the master process that belongs to the .oldbin PID.
      # This enables 0 downtime deploys.
      old_pid = "/home/myuser/rails_apps/myapp/tmp/unicorn.my_site.pid.oldbin"
      if File.exists?(old_pid) && server.pid != old_pid
        begin
          Process.kill("QUIT", File.read(old_pid).to_i)
        rescue Errno::ENOENT, Errno::ESRCH
          # someone else did our job for us
        end
      end
    end
    
    after_fork do |server, worker|
      # the following is *required* for Rails + "preload_app true",
      if defined?(ActiveRecord::Base)
        ActiveRecord::Base.establish_connection
      end
    
      # if preload_app is true, then you may also want to check and
      # restart any other shared sockets/descriptors such as Memcached,
      # and Redis.  TokyoCabinet file handles are safe to reuse
      # between any number of forked children (assuming your kernel
      # correctly implements pread()/pwrite() system calls)
    end
    
  4. Check that your application runs correctly on Unicorn by starting it from your rails application directory:
    unicorn_rails -c config/unicorn.rb -E production -D -p 12006
    

    You should now see 5 new processes in your top: the unicorn master and 5 workers:

    > top -u myuser -c
    top - 17:21:53 up 64 days, 14:06,  2 users,  load average: 1.20, 1.19, 1.36
    Tasks: 306 total,   2 running, 303 sleeping,   0 stopped,   1 zombie
    Cpu(s): 11.4%us,  2.7%sy,  0.6%ni, 77.8%id,  7.3%wa,  0.0%hi,  0.1%si,  0.0%st
    Mem:  10376292k total,  9823156k used,   553136k free,   419012k buffers
    Swap:  5406712k total,     1220k used,  5405492k free,  6433556k cached
    
      PID USER      PR  NI  VIRT  RES  SHR S %CPU %MEM    TIME+  COMMAND
    19318 myuser    18   0  2596 1160  760 R  1.9  0.0   0:00.01 top -u myuser -c
    14518 myuser    15   0 39800  33m 3940 S  0.0  0.3   0:01.80 unicorn_rails master -c config/unicorn.rb -E production -D -p 12006
    14564 myuser    18   0 39884  31m 2320 S  0.0  0.3   0:00.09 unicorn_rails worker[0] -c config/unicorn.rb -E production -D -p 12006
    14565 myuser    15   0 39808  31m 2276 S  0.0  0.3   0:00.07 unicorn_rails worker[1] -c config/unicorn.rb -E production -D -p 12006
    14566 myuser    15   0 39800  30m 1732 S  0.0  0.3   0:00.01 unicorn_rails worker[2] -c config/unicorn.rb -E production -D -p 12006
    14567 myuser    15   0 39808  31m 2096 S  0.0  0.3   0:00.05 unicorn_rails worker[3] -c config/unicorn.rb -E production -D -p 12006
    

    And now you should again be able to see your Rails application served by Unicorn using its external URL http://my_public_url.com:12006.
    Then you can shut down your Unicorn server by using the PID of the master process (1234 in my example), and sending the QUIT signal:

    kill -QUIT 1234
    

Unicorn setup with nginx

Now that your Rails application can execute in Unicorn and you have a valid nginx setup, it is time to configure them to put Unicorn behind nginx.
You may have noticed in our Unicorn configuration that the Unicorn server also listens to a socket Unix file (/home/myuser/rails_apps/myapp/tmp/my_site.socket). Time for nginx to route requests to this socket file.

  1. Update nginx configuration file to send requests to the Unix socket. This is done by adding the upstream section:
        #gzip  on; 
     
        # this can be any application server, not just Unicorn/Rainbows!
        upstream app_server {
          # fail_timeout=0 means we always retry an upstream even if it failed
          # to return a good HTTP response (in case the Unicorn master nukes a
          # single worker for timing out).
       
          # for UNIX domain socket setups:
          server unix:/home/myuser/rails_apps/myapp/tmp/my_site.socket fail_timeout=0;
       
          # for TCP setups, point these to your backend servers
          # server 192.168.0.7:8080 fail_timeout=0;
          # server 192.168.0.8:8080 fail_timeout=0;
          # server 192.168.0.9:8080 fail_timeout=0;
        }
     
        server {
            listen       12006;
    
  2. Update nginx configuration file to server static files from your Rails’ public directory. This is done by removing the / location and adding a root directive:
        server {
            listen       12006;
            server_name  my_public_url.com;
    
            #charset koi8-r;
    
            #access_log  logs/host.access.log  main;
    
            # Comment out "location /" section
            #location / {
            #    root   html;
            #    index  index.html index.htm;
            #}
    
            # Serve static files from the Rails application
            root /home/myuser/rails_apps/myapp/public;
    
            #error_page  404              /404.html;
    
  3. Update nginx configuration file to server all URI to our application server. This is done by adding a location section handling all URIs:
            root /home/xaeoncom/rails_apps/testr3/public;
    
            # Prefer to serve static files directly from nginx to avoid unnecessary
            # data copies from the application server.
            #
            # try_files directive appeared in in nginx 0.7.27 and has stabilized
            # over time. Older versions of nginx (e.g. 0.6.x) requires
            # "if (!-f $request_filename)" which was less efficient:
            # http://bogomips.org/unicorn.git/tree/examples/nginx.conf?id=v3.3.1#n127
            try_files $uri/index.html $uri.html $uri @app;
    
            location @app {
              # an HTTP header important enough to have its own Wikipedia entry:
              # http://en.wikipedia.org/wiki/X-Forwarded-For
              proxy_set_header X-Forwarded-For $proxy_add_x_forwarded_for;
    
              # enable this if you forward HTTPS traffic to unicorn,
              # this helps Rack set the proper URL scheme for doing redirects:
              # proxy_set_header X-Forwarded-Proto $scheme;
    
              # pass the Host: header from the client right along so redirects
              # can be set properly within the Rack application
              proxy_set_header Host $http_host;
    
              # we don't want nginx trying to do something clever with
              # redirects, we set the Host: header above already.
              proxy_redirect off;
    
              # set "proxy_buffering off" *only* for Rainbows! when doing
              # Comet/long-poll/streaming. It's also safe to set if you're using
              # only serving fast clients with Unicorn + nginx, but not slow
              # clients. You normally want nginx to buffer responses to slow
              # clients, even with Rails 3.1 streaming because otherwise a slow
              # client can become a bottleneck of Unicorn.
              #
              # The Rack application may also set "X-Accel-Buffering (yes|no)"
              # in the response headers do disable/enable buffering on a
              # per-response basis.
              # proxy_buffering off;
    
              proxy_pass http://app_server;
            }
    
            #error_page  404              /404.html;
    
  4. Start your nginx server from its installation directory:
    ./sbin/nginx
    
  5. Start your Unicorn server from your Rails application directory, with no port specified (it will use the Unix socket from its configuration instead):
    unicorn_rails -E production -D -c config/unicorn.rb
    

You can find a complete nginx.conf file example here.

And now you should be all set.

You should have master and worker processes for both nginx and unicorn:

> top -u myuser -c
top - 20:16:39 up 64 days, 17:01,  3 users,  load average: 1.45, 1.12, 1.15
Tasks: 295 total,   1 running, 293 sleeping,   0 stopped,   1 zombie
Cpu(s): 12.8%us,  1.6%sy,  0.0%ni, 69.3%id, 16.1%wa,  0.0%hi,  0.2%si,  0.0%st
Mem:  10376292k total, 10123176k used,   253116k free,   439456k buffers
Swap:  5406712k total,     1220k used,  5405492k free,  7523664k cached

  PID USER      PR  NI  VIRT  RES  SHR S %CPU %MEM    TIME+  COMMAND
30744 myuser    15   0  2556 1184  808 R  0.3  0.0   0:14.72 top -u myuser -c
  631 myuser    15   0 39788  33m 3892 S  0.0  0.3   0:01.67 unicorn_rails master -E production -D -c config/unicorn.rb
  660 myuser    15   0 39788  30m 1760 S  0.0  0.3   0:00.01 unicorn_rails worker[0] -E production -D -c config/unicorn.rb
  661 myuser    15   0 39788  30m 1760 S  0.0  0.3   0:00.01 unicorn_rails worker[1] -E production -D -c config/unicorn.rb
  662 myuser    18   0 39868  31m 2332 S  0.0  0.3   0:00.05 unicorn_rails worker[2] -E production -D -c config/unicorn.rb
  663 myuser    15   0 39868  31m 2336 S  0.0  0.3   0:00.07 unicorn_rails worker[3] -E production -D -c config/unicorn.rb
 8612 myuser    25   0  6000  704  336 S  0.0  0.0   0:00.00 nginx: master process ./sbin/nginx
 8615 myuser    15   0  6152 1196  620 S  0.0  0.0   0:00.00 nginx: worker process

And your Rails application should be accessible using its external URL: http://my_public_url.com:12006, running nginx, forwarding requests to unicorn.

Howto, Ruby on Rails, Web development , , , , , , ,

How to install custom ROM on Asus TF300TG Transformer Pad

Lately, I received a TF300TG Asus Transformer Pad, shipping with a stock Asus JellyBean (Android 4.1.1) OS.
It is awesome, reactive, playful, efficient, has 3G connectivity with a SIM card slot… but does not have broadband telephony feature!
So I decided to delve into the world of Android unlocking, rooting, and custom ROMs installations to try using it as a phone.
It was a first time for me, and so I decided to share my experience and note all the steps to install custom ROM on Asus TF300TG pad.

  1. Android architecture
  2. Unlock the boot-loader
  3. Install a new boot-loader (aka recovery)
  4. Root it: grant privileges
  5. Backup your system
  6. Install new ROM

Android architecture

First, what are the involved software components in installing custom ROMs on an Android device?

  1. The boot-loader: it is the first application to be started when switching on the device. It is responsible for system updates and recovery processes. Usually it is locked by vendors: this means that you cannot install another boot-loader without voiding your warranty.
  2. The Android Kernel: This is a software layer responsible for direct communication with your hardware. Each phone or pad has a Kernel suited to its hardware. Some vendors distribute it, others don’t.
  3. The Android OS: Android as you know it: a collection of applications, and their different middle-ware layers using the Kernel to work.

This is a broad view of Android architecture, just highlighting the components we will be considering in this post.

All those software components are installed on the device’s internal files system. Installing a new ROM means basically being able to overwrite files of the Android OS and Kernel.
However by default, vendors provide a guarantee on their hardware given that their user can’t modify system files. They enforced this by limiting privileges users have by default on system files (most of them won’t even be able to see those system files). Therefore users need to be granted special privileges to modify system files, and so to install custom ROM.

Basically, acquiring those privileges mean voiding your guarantee on your product.

This post explains all the steps involved in installing ROM on an Android device, focusing on the Asus TF300TG Transformer Pad when needed:

  1. Unlocking the boot-loader to be able to install a new one
  2. Installing a new boot-loader, able to modify system files
  3. Rooting it by installing files that give all privileges
  4. Backuping the current system, to be able to retrieve it in case of problems
  5. Installing new ROM on the device

Unlock the boot-loader

Before proceeding, you have to know that unlocking the TF300TG boot-loader simply voids your guarantee.

This being said, Asus itself provides a boot unlocker from their website. It is indexed on the TF300T page, but also works on the TF300TG model.

Download it (should be a file named UnLock_Device_App_V7.apk), and copy it to your tablet’s “Internal storage” as seen when connected to your computer.

Then from your tablet, execute this file (use a files explorer to locate it). You may need to have enabled “Debug mode” and “Install applications from mock locations” in your pad’s settings to execute it. Go through the whole installation process.

Your boot-loader is then unlocked. From now on, when booting your TF300TG, you will see a little message on the upper left corner: “Device is unlocked”

More info here.

Install a new boot-loader (aka recovery)

Once your boot-loader is unlocked, you can install a new one.
There are basically 2 main boot-loader out there:

Personally I would recommend TWRP, as it is far easier to use.

Download the boot-loader of your choice on your computer. It usually fits in a file with extension .blob or .img.

At this point, you will need to have installed Android developer tools on your computer. They include the fastboot tool which we will be using.
Sometimes vendors’ drivers install those tools with their software suite. If not the case, you can always get them by installing the Android SDK, published by Google itself.

Once fastboot is available on your computer, follow those steps to install the new boot-loader:

  1. Shutdown the pad
  2. Connect the pad to your computer using its USB cable
  3. Press the “Volume down” button on the side, along with the Power button on the top, and keep them both pressed until you see something on your screen. You can then release the buttons. This is called booting your pad in Recovery mode.
  4. Select the USB icon using the “Volume down” button ONLY, and then press the “Volume up” button to select the USB icon once it is highlighted. This makes your device wait for data from the USB connection.
  5. On your computer, open a command line and get to the directory where you downloaded the new boot-loader (file .blob or .img).
  6. Type the command fastboot -i 0x0B05 flash recovery the-file-name.blob, replacing the-file-name.blob with the name of your downloaded file. This will upload the new boot-loader to your device. If an error occurs, it certainly means that fastboot is not installed correctly, or that your current boot-loader is not unlocked.
  7. Type the command fastboot -i 0x0B05 reboot to reboot your device.

You now have a new boot-loader.

More info here.

Root it: grant privileges

Now that we have a new boot-loader, time has come to use it to install a special software package that will grant root privileges.

  1. Download the rooting package SuperUser from here and copy it to the pad’s “Internal storage”.
  2. Shutdown your pad and boot it in recovery mode (see previous section).
  3. Press the “Volume up” button to select the already highlighted RCK icon (not the USB one). This will launch your newly installed Recovery Process.
  4. In the Recovery Process interface, choose to “Install a zip file from sdcard”, and select the newly copied SuperUser Zip file. Go through the complete installation process.

CWM interface uses the “Volume down” and “Volume up” buttons to navigate, and the Power button to select.
TWRP interface is simply tactile.

Your pad is now rooted.

Backup your system

Once your pad is rooted, I strongly advise that you backup your full system before trying to install any ROM.

  1. Boot in recovery mode, and launch the Recovery Process (see previous section).
  2. Navigate to Backup, select the system files, and go through the whole process.

You are now ready to install new ROM!

Install new ROM

ROM can be found in many places over the web. Great resources indexing ROM for a lot of devices are the XDA forums. There you will find all the ROM available for your device.

Be sure that you install a ROM that fits your device! Lots of ROM update the Android Kernel, or rely on specific Kernels. Therefore using a ROM that is fit to another device might crash your Android. If this happens, no panic: you have backed up your system, you can restore it using the Recovery Process (boot in Recovery mode, launch the Recovery Process, then select “Restore” and point it to the backup you made earlier).

Here are the usual steps needed to install a new ROM:

  1. Download the ROM and copy it to the pad’s “Internal storage” (usually a big Zip file).
  2. Boot in Recovery mode, and launch the Recovery Process.
  3. Select “Factory reset” your device. Don’t worry, it will not erase the backups you may have made earlier.
  4. Select “Install zip from sdcard” and select the zip of your ROM. Go through the complete installation process.
  5. Select “Wipe” both the “Cache” and the “Dalvik cache”.
  6. Select “Reboot”.

Usually XDA forums have very complete threads on installing ROMs on devices. I strongly suggest you read them carefully before proceeding.

More info here.

This way I managed to install and test many different ROMs on my Asus TF300TG, a lot of them were rather unstable, and I was always able to get back to my backup went things went wrong.

However … I couldn’t find any that allowed usage of the telephony feature with my SIM card.
Next step is for me to understand how to activate this feature. Will be another post for that.

Android, Howto , , , , , , , , , , , ,